Showing posts with label Baby. Show all posts

Monday, July 6, 2015

Swoon Baby Quilt the Second

Swoon Baby Quilt the Second was actually finished in March, but didn’t reach its recipient until July. Such is life.


In six months, I made three quilts in this same style. For this one, I chose a Cotton + Steel fabric as the backing: Steamer Trunk in Gray Green from Alexia Abegg’s Hatbox line. Once that was decided, I set about finding coordinating solids. Since the light green color didn’t have an exact match on my Kona color card, I matched the fabrics in person at Quiltworks Northwest, during a Seattle Modern Quilt Guild sew in. I don’t remember the names of each fabric, but they are a combination of Kona and Art Gallery solids. The binding is Dottie, also from Cotton + Steel.


Like my other versions, this one was constructed with a 24” Swoon block and 6” borders and finishes at 36” square. I machined quilted it with diagonal lines one inch apart. It’s quicker than my usual ½” apart lines, and makes for a softer quilt that will still stand up to repeated washings.


Even though I’ve made the same quilt three times now, it continues to be my go-to baby quilt and I anticipate whipping up more should the need arise. They’re quick, cute, and I enjoy making them.


Wednesday, May 6, 2015

Swoon Baby Quilt the Third


Last fall, I discovered the perfect formula for a fast and fun baby quilt: choose a print fabric for the backing, make a Swoon block out of coordinating solids, add a 6” border all around, quilt, bind and give away! This is actually the third baby quilt that I’ve made this way, but I haven’t managed to give the second one to its new owner yet, so you’ll have to wait a bit longer to see that one.

For this quilt, I matched the fabric to the new baby’s nursery theme (ocean) and colors (yellow and blue). The backing fabric I found at Hawthorne Threads was a perfect match: Whales in Bright by Ann Kelle from her Urban Zoologie collection. Once I had the backing fabric in my hands, I picked out coordinating Kona solids from Fat Quarter Shop: Cheddar, Prussian, Snow and Water. Since this was the third time I made this pattern, I barely had to think about it as I sewed it together.

For the quilting, I marked one diagonal line through the center, and used that as a guide to quilt lines 1” apart across the entire quilt. Again, quick and easy. So quick, that I was able to present it to the new mom-to-be before she went on maternity leave. While I enjoyed every minute of planning and making this quilt, the best part was seeing how much my friend liked it and knowing that she and her new baby will enjoy it for years to come.


Monday, November 24, 2014

Swoon Baby Quilt the First


This is definitely one of my favorite quilts this year. I love that the front is all solids with cozy printed flannel on the back, I love the simple, modern feel of it, I love that it came together in only a couple of weeks, and I love that it was given to a close friend for her upcoming baby.


Let’s start with the pattern. I used the Swoon pattern from Thimble Blossoms and made just one 24” block. I added a 6” border for a 36” square quilt. You can see my inspirations here. It’s a very easy to follow pattern, with color diagrams that I found helpful. Normally, I don’t like to add borders, but I didn’t mind it on this small quilt.


All the fabric is from Pacific Fabrics in Everett. I knew that this quilt needed to feature green, blue and at least one jungle animal. I could not for the life of my find any jungle fabric I liked online, so I hit up Pacific Fabrics in person. There I found this mini elephant flannel from Timeless Treasures. Once I had my backing sorted, I chose four Kona solids from what was in stock in the store: Bleached White, Clover, Royal and Blueberry.


My goodness, I love using flannel as a backing! I polled my Instagram followers for tips on sewing with flannel and prewashed the fabric, according to their advice. It is so cozy and warm that I simply loved working with it. I almost didn’t want to finish hand sewing the binding, it was so comfy!


The quilting I chose is very similar to my Giant Snowburst Quilt: a big ‘x’ in the middle, then echo quilting to the edges. Instead of quilting the lines half an inch apart, this time I quilted them a full inch apart. It was quicker and I thought the less dense quilting would be comfier for a baby quilt. Another twist is that I used both white and green thread to quilt it. The central ‘x’ is green, along with every third line. The rest of the lines are white.


I cannot overstate how much I like this quilt. I might just keep making this one over and over for gifts, it’s so quick and satisfying!


Friday, September 19, 2014

Bubblegum Glam Clam Quilt


Inspiration

They say that in order to be successful at something, you must want it more than you fear it. That certainly was the case with me and the Bubblegum Glam Clam Quilt. This past April, I felt compelled to make my daughter a new quilt for her bed in her favorite color. (My husband had let my daughter pick out new sheets, and they didn’t match the existing quilts.) The problem was, I didn’t know which pattern to use. One night, I stumbled across the Glam Clam pattern by Latifah Saafir, aka The Quilt Engineer. I was awestruck, and was determined to make one for my daughter. Since I had never sewn a quilt pattern with curves before, I chose to go with the 12” clamshell version. After downloading the PDF pattern from Craftsy (it’s free!), I was pleased to find that the Large Baby size would be a perfect fit for my daughter’s toddler bed.


Fabric Selection

My daughter’s favorite color is pink, but as that is one of my least favorite colors, I didn’t have very many pink fabrics in my stash. To fix that, I ordered a pink fat quarter color stack from Pink Chalk Fabrics, then added a couple fabrics from my stash, along with a handful of solids and two of Lizzy House’s Pearl Bracelet fabrics. When I saw the Ripples in Rose fabric by Bari J. Ackerman, I knew it had to be the backing. The binding was the last fabric I chose, and I decided on the Cotton + Steel basic Dottie in Cotton Candy Gold.


Cutting

Since I don’t have access to one of those fancy die-cutting contraptions, I cut out the clamshells by hand, using the templates. It was time consuming, but I was so excited about this quilt that I powered through it somehow. The cutting would have gone faster had I been using yardage and not mostly fat quarters, but I like how scrappy it ended up.


Piecing

I kid you not, this is one of the quickest quilt tops I have ever sewn together. Normally, I would have been nervous about sewing so many curves, but I was hopeful after viewing Latifah’s YouTube video a few times. I actually love the no pin technique for curves. In an afternoon, I sewed eight rows together! I didn’t really understand the instructions for the last row, but I wasn't about to let that stop me. By the end of the week, the quilt top was done. Then it sat for a month before I had a chance to baste it.


Quilting

Once the quilt was basted, I immediately got to work on machine quilting it. I had an overly ambitious plan that I changed on the fly. I stitched in the ditch along one row, and then used that line to guide my ½” echo quilting. Being unused to quilting curves, this plan led me down a path I did not expect. I do all my machine quilting with a walking foot, and the tightest curves proved to be quite a challenge. (Note to self: overcome fear of free motion quilting next.) I did a lot of unpicking. I set it aside for a bit. I picked it up again and stitched one line at a time. After two months of struggling with it, I finally finished the quilting. The binding was on in a flash, and then came the moment of truth.


My daughter loves this quilt! I was pretty sure she would, since throughout the spring and summer she kept asking if I was working on it, but it is still immensely gratifying to see her use it every night, and drag it from room to room during the day. It won’t replace her security blanket, but I dare say that at the moment, it’s her favorite quilt. It’s one of my favorites, too.


Tuesday, April 29, 2014

Vintage Modern Marmalade Baby Quilt

Have you ever gone through a period of time where you want to sew, but nothing you are currently working on excites you? That was me around late-February, early-March this year. I was also feeling like my stash was getting a little stale, so I decided to make a little room by using up two charm packs that I had been holding onto for years: Vintage Modern and Marmalade, both by Bonnie & Camille. Honestly, they coordinate so well, it was like one fabric line was an extension of the other, with is kinda fun.


I wanted something quick and simple that involved controlled scrappiness. Inspired by the scrap therapyquilts of teaginny and Emily Cier’s book Scrap Republic, I cut 72 charms in half, then sorted them into color groups. At this point, a design wall would have come in very handy. Initially, I mixed the low volume prints with the neutral prints, but when I sewed together the columns, it just looked all wrong. As a rule, I am loathe to break out the seam ripper, but in this case, it was warranted. I like the end result so much better after I tore it apart and reassembled it with all the low volume prints in the right color group.


Going along with the stash busting theme, I used a coordinating stripe from one of the lines for the binding, and my favorite Pearl Bracelets for the backing. This quilt is roughly 36” by 36” and I only had a yard of the backing. In the end, it worked out, but I  definitely learned why it’s a good idea to allow a few extra inches of backing all around. (The sides of the quilt are just a little skinnier than originally planned, due to some necessary but regrettable trimming.)


For the quilting, I reinforced the horizontal lines of the quilt by quilting ½” from each horizontal seam with my walking foot. I used Aurifil thread #2000, which is slightly off-white. Thanks to the luxury of a sewing day with my mom, I was able to complete the quilting the same day I started!


I finished this quilt at the most recent Seattle Modern Quilt Guild sew-in. Between the stimulating company and the glow of a finish, I feel creatively revitalized, like a garden in springtime.


Friday, February 7, 2014

January Jewels Baby Quilt

Last weekend I went on my first quilting retreat, and it was amazingly productive. Having cut the fabric beforehand, I managed to completely piece, quilt and bind this baby quilt during the retreat!


The seeds of this quilt were planted last January when the Scrappy Trip Along trend took Instagram and the quilty blogosphere by storm. It’s no wonder this technique has been so popular. It’s simple, quick, fun and lends itself to using up scraps. The original tutorial can be found on the Quiltville blog, and a handy size guide at Just a Bit Frayed.


While I love scrappy quilts in theory, in practice I like my creations to be more cohesive. Instead of using all scraps, I started with fat quarters from Jeni Baker’s Color Me Retro fabric line and threw in some Lizzy House Pearl Bracelets and miscellaneous coordinating scraps, while sticking to a color theme of aqua, blue, lime green, purple and white. Each block is bisected by a dark blue fabric, which further unifies the blocks. The backing is more Pearl Bracelet and the binding is an anonymous solid.


After spending a year admiring other bloggers’ Scrappy Trip Along quilts, it was very satisfying to make one of my one. It was also extremely gratifying to finish a quilt in a weekend, something I had never done before. (My previous record was sixteen days.) The only problem is, I like this quilt so well that I want to make a larger one to keep for myself! Next time I have a stack of fat quarters in need of a pattern, I just might try this pattern again.


Monday, June 25, 2012

Zany Zigzag Baby Quilt


The evolution of a quilt can be interesting at times. This one started when a friend of mine told me she was expecting a little girl. Her colors were purple and pink, and her theme was flowers and butterflies. Since I didn’t have many pink fabrics in my stash, I bought a few half yards and pulled more fabrics from my shelves. The stack sat and sat until I decided on a pattern. I knew I wanted to use half-square triangles, but was stuck until I saw Cluck Cluck Sew’s Scrappy Chevron quilt. Then I had to swap out fabrics until I had an equal number of light pinks and dark purples. Each block is a chevron made from one purple print and one pink print. I made more blocks than necessary so that I could rearrange them until the zigzags turned out how I wanted them to.
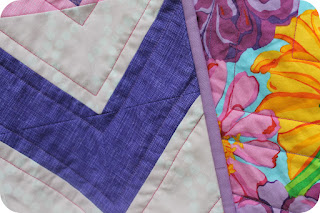
Quilting this baby quilt was especially satisfying. I used two colors of thread, pink in the pink zigzags and purple in the purple zigzags and followed the seams. The back is a flowery print that I’ve used for a backing before. The binding is Thistle, a Kona solid. I am quite satisfied with the results and can’t wait to give it to its new owner.

Linking up to Sew Modern Mondays.

Tuesday, June 12, 2012

Baprons, Baby!


Kids sure are messy. It never ceases to amaze me how messy my sweet girl can be when she eats. She can decimate a bib in no time flat, so when I saw the baprons (baby aprons) that Jess at Craftiness is not Optional had made, I knew I had to make some myself. There was no flannel in my stash, so I made a little quilt sandwich and quilted them by machine. If only I had started sooner! The pattern that Jess so generously shared is not quite big enough for my growing girl. These baprons just barely fit right now, but she will most likely outgrow them before she wears them out. I plan to enlarge the pattern, though, because baprons are just too dang cute! (Also, she can’t rip them off like she can rip off traditional bibs.) I love the two I made out of stashed fabrics and binding scraps, even though they aren’t my best work. Baprons are the perfect size to experiment with different quilting techniques and I had fun trying out free motion quilting for the first time. I need to make plenty more baprons before I can move on to free motion quilting on actual quilts. In the mean time, I enjoy gazing across our dining room table at my sweet daughter enjoying her meal while wearing something I made. Eventually I intend to sew actual clothes for her, but in the meantime, I will enjoy the baprons.


A Quilter’s Table

Fresh Poppy Design

Tuesday, March 6, 2012

Blueberry Pie (Pops)


Sometimes it's easy to get caught up in the consumerist mindset of always buying the latest and greatest fabric lines. I know I do now and again. More often, I find myself enjoying the process of working with the fabric I have on hand, especially scraps from other projects. For example, my recently finished Blueberry Pie baby quilt is composed almost entirely of scraps, both my own scraps and scraps from a family scrap swap. A few fat eighths that I received as a gift were the only non-scrap fabric.


When I participated in a family scrap swap last year, I wanted to start using the scraps I received sooner rather than later. At first, I didn't know which pattern to use, but when I saw Blueberri Breezes at Angel Scraps Quilting, I was motivated to make my own version. After the top was finished, I still had quite a few scraps left over. Inspired by Missing the Point by Ocheltree Design, I decided to cut the remaining scraps into 2.5" strips and piece them together end-to-end and see where that led me. I wasn’t expecting to make the backing entirely of scraps, but that’s what happened! I even incorporated the tiniest of scraps using completely cauchy’s Scraptacularity method, which I loved.


I quilted Blueberry Pie in a cross-hatch pattern following the design of the “front.” In the end, I like the “back” even better. The binding is also made from scraps, but I bet that’s not a big surprise. This quilt was so enjoyable to make, that I felt compelled to celebrate its completion with baked goods, specifically, Blueberry Pie Pops.


Pie making seems to run in my family, but I’ve never made Blueberry Pie (or Pie Pops) before. By combining Cakespy’s Pie Pop recipe and Macrina Bakery’s Classic Blueberry Pie recipe, I managed to make a passable Blueberry Pie Pop. Somehow I ended up with too much pie filling and not enough dough, so I will share my particular recipe after all the wrinkles are ironed out.


If you like either quilts or food, stop by A Quilter’s Table for Tuesday at the Table. If you like scraps, check out Stitched in Color’s Scrap Attack. I also plan to link up with Finish it Up Friday at crazy mom quilts.


Scrap Attack Quilt-Along