
Showing posts with label 2014 Finish. Show all posts

Monday, January 12, 2015

2014 in Review


I have to say, overall I am pleased with the projects I finished in 2014. In spite of health set-backs and day job challenges, I managed to finish seven quilts, seventeen garments, four small projects and thirty-five gift bags.

Quilts


Of all the quilts I made in 2014, my favorite is the Bubblegum Glam Clam quilt that I made for my daughter. It was the most challenging, and it warms my heart to see my daughter use it every day. Looking back at my quilts, I find it interesting that of the seven I finished in 2014, five were square (January Jewels, Giant Snowburst, Vintage Modern Marmalade, Swoon Baby Quilt the First and Scrappy Migration), and four featured a large amount of white (Giant Snowburst, Patriotic X and Plus Quilt, Swoon Baby Quilt the First and Scrappy Migration). White is not very practical, but I do like how it looks. 

Garments
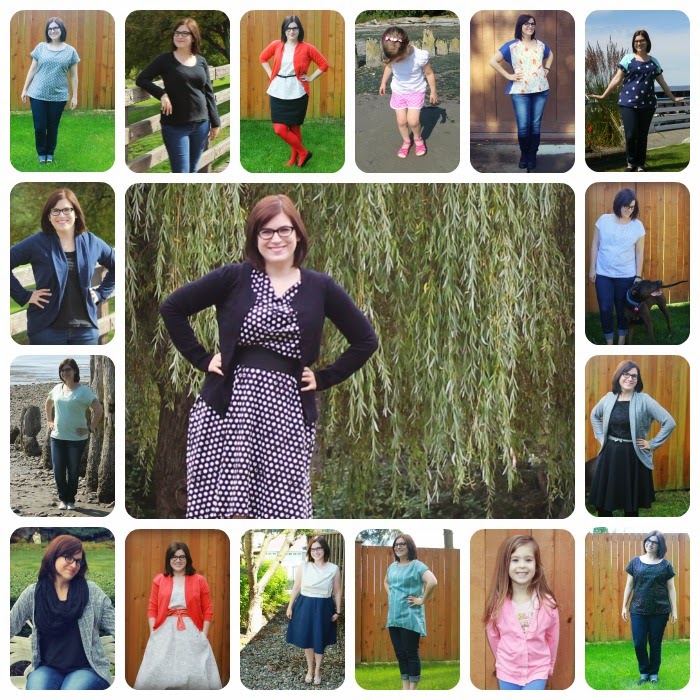
When I totaled up the garments I sewed in 2014, I was surprised when the count hit seventeen! I made five Belcarra Blouses, three Julia Cardigans, two Myrtle Dresses, one Crepe Dress, one Wiksten tank, one Staple Tunic, one pair of City Gym Shorts, one Plantain Tee, one Bess Top and one Greenpoint Cardigan. It’s hard to choose, but my favorite garment of 2014 is my Dotted Boulevard Myrtle Dress, because it was my first knit project, my first successfully finished Colette pattern, and I feel good wearing it. 

Small Projects

What with all the quilts and garments I made, I only finished four small projects last year. Of those, my favorite is the Cotton + Steel Quilted Placemats. 

Gift Bags

If you’d like to see the thirty-five gift bags I finished in 2014, check out the Gift Bags tag. That’s too many to turn into a collage! 

2014 Goal Progress

Back in January, I set a few goals for myself for 2014. Here’s how I did:

Use my stash: While I did buy a good amount of new fabric last year, I also dipped into my stash quite a bit. Six of my seven quilts used at least one fabric from my stash, and a couple of my garments were made from stash fabric. The biggest stashbuster were the gift bags, the vast majority of which were made last-minute from fabric I already had on hand. Still, my stash could stand to be reduced further, so I’ll continue with this goal into 2015. Now that I’ve acquired a small stash of apparel fabrics, this goal applies to garment sewing, too.

Use my scraps: Last year, I definitely made more scraps than I used. Only one quilt top and one garment were made entirely from scraps last year. This goal will also be on my list for 2015, since it still needs a lot of work.

Keep It Small, Silly: In 2014, I made a goal to sew smaller quilts, since previously I was wont to bite off more than I could chew and make bigger quilts than I needed to. I consider this goal achieved, since most of the quilts I completed were baby sized or smaller. Finishing smaller quilts more often was so satisfying, that I think I’ll try it again in 2015.

Here’s to continued productivity and creativity in 2015!

Tuesday, December 30, 2014

Christmas 2014 Gift Bags


Long-time readers of this blog may be weary of seeing fabric gift bags, but I’m not tired of making them! This December, I was a bag making machine, and churned out seventeen gift bags. The first five were simplified versions of the Lined Drawstring Bag from In Color Order, but I decided that it wasn’t going to work for the large amount of bags I needed. For the twelve bags that I whipped up in an assembly line fashion, I used the Reversible Patchwork Bag tutorial from Pink Penguin. My favorite bag is the jumbo one I made out of a charm pack of Kate Spain’s Solstice line. Often I buy a charm pack of a line so I can see the fabrics in person before deciding if I want to buy any yardage, so I have quite a few floating around without a planned purpose. Speaking of yardage, I think I only used only one new fabric in these bags – the rest was stash!


I’ve been making fabric gift bags for Christmas since 2010. My mom makes them too, so we always have several moving back and forth between our houses. This year, between the extras I made, and the ones we received from my parents, I finally feel like I have a head start on next year’s Christmas gift bags. Here’s hoping I keep up the momentum and reduce the inevitable holiday stress by having my Christmas gift bags all finished earlier next year.

Monday, December 29, 2014

Christmas Cowls


I don’t know about you, but I live in scarves and cowls during the winter. As a last minute Christmas present, I decided to whip up a couple cowls for family members. I purchased the Scarves and Cowls pattern by Make It Perfect via Indie Sew and set to work.


For the first cowl, I used flannel Sketch fabric from Timeless Treasures, purchased specifically for this project. Everything was going smoothly until it came time to join the ends together and turn it right side out. At that point, my cowl turned into a tube. I read and reread the directions. For the life of me, I could not figure out what I was doing wrong. I thought I was following the directions, but it was hard to tell, because there were no pictures whatsoever. Frustrated, I unpicked the last seam, turned it right side out, and then contorted it so that I could sew most of the seam by machine. Then I finished the seam by hand. As soon as I put it on, I loved it. So cozy! This one was really hard to give away. I’ll have to make myself a flannel cowl soon. 

Emboldened by the success of my first cowl, I dove into my stash and pulled out two long hoarded Kate Spain Cuzco prints for the second cowl. For this one, I cut 9” strips instead of 12” and I like how it turned out. It's like two cowls in one!

I will definitely make more cowls with these dimensions again, but I’ll continue to disregard the pattern instructions, since they don’t make sense to me. At the end of the day, what matters is the finished product, and I’m really pleased with these two cowls. I hope the recipients enjoy them.

Sunday, December 28, 2014

Cotton + Steel Quilted Placemats


I didn’t make a lot of handmade gifts this holiday season, but what I did make, I really like. First up are my Cotton + Steel Quilted Placemats. I subscribe to the Pink Castle Fabrics Cotton + Steel Club, so each month, I receive a bundle of assorted Cotton + Steel fabric. Purl Bee’s Quilted Placemats were the perfect way to play with my new fabrics while simultaneously making a present. I used four different fat quarters for the front of the placemats. For the back, I used Dottie fabric for all of them, for consistency’s sake. Two of the backs are actually leftover fabric from my Bubblegum Glam Clam quilt. The bindings were all solids from my stash.


I really loved making these placemats. They were simple, fast and fun. It was a joy to quilt something small for a change. Even though I don’t usually do bias binding, the oval shape was so much fun to bind. No corners to miter! It was so satisfying to finish one of these in between my bigger projects. I definitely see more quilted placemats in my future.


Saturday, December 27, 2014

Sparkle Sweater Knit Julia Cardigan


For the holiday season, I wanted to make a festive cardigan to wear to the various parties I was scheduled to attend. Since time is always at a premium in December, I decided to make another Julia Cardigan rather than try a new pattern. This is the third one I’ve made, and I’m getting quicker with each one.


The fabric is from Fabric.com and was called “Stretch Sparkle Sweater Knit Silver.” In the time it took to arrive at my house, it disappeared from the website. This was my first time sewing with a sweater knit. It was a little more challenging than other knits I’ve worked with, but manageable. I didn’t pay a lot for it, and you can tell. My biggest complaint is that it snags constantly. In the cut I received, I found two major snags before I even started sewing. Short on time, I pressed ahead, but each time I wear this sweater, it snags every time I turn around. I fear it’s not long for this world.


Another issue I had is that the sleeves “grew” between the time I cut them, and the time I finished sewing them to the body. That problem was mitigated because of another problem that I created myself. In my rush to finish this in time, I sewed the first cuff on to the wrong side of the sleeve. I tried to fix it by making it a French seam, but it was way too bulky. By the time I had trimmed everything up, I lost an inch and a half of the cuff and an indeterminate amount of the sleeve, which offset the “growth” that had happened. That was the left sleeve. On the right sleeve, I trimmed an inch and a half off the cuff, but forgot to trim the sleeve, so the right sleeve is slightly longer than the left sleeve. With only a short time to go before I left the house for a day of parties, I decided to just leave it.


This is not my best work, but I’m okay with that. I reached my goal of sewing a festive cardigan before my holiday parties, and practiced sewing with a sweater knit. Next time, I’ll invest in better quality fabric, and give myself more time, in order to avoid preventable mistakes.

Friday, December 12, 2014

Scrap Migration Quilt


Did you know that the Seattle Modern Quilt Guild will have a new exhibit early next year? In celebration of the guild turning five years old, there will be a My MODERN exhibit at Island Quilter from January 2 to February 5, 2015. Previously, I have entered preexisting quilts in the guild exhibits, but this time, I was inspired to make a brand new quilt especially for this exhibit.


Scrap Migration came about because the construction of my Patriotic X and Plus Quilt resulted in a pile of leftover half-square triangles. I knew I wanted to use alternate grid work and end up with a quilt 36” square, and the design just evolved from there. Those lonely half-square triangle blocks became scrappy flying geese set against an improvisational pieced background.


The top and binding of Scrap Migration are made entirely of scraps from other quilts, and the back is made from scraps and stash fabric. Even the batting was leftover from another project. How’s that for using what’s on hand? In fact, I’m almost completely out of white scraps now. Guess I’ll just have to start a new quilt!


Linking up to Scraptastic Tuesday at She Can Quilt.


Friday, November 28, 2014

En Route Julia Cardigan

After I finished my first Julia Cardigan, I immediately wanted to make another one. This time, I used a print instead of a solid: En Route Knit in Gravel by Frances Newcombe for Art Gallery Fabrics. All in all, I’m quite pleased with it. It did roll some, but the print is forgiving, so I practiced finding the grain in knit fabric without stressing out about it. The fabric is soft and cozy, perfect for this cocoon-style cardigan.


For this version, I played around with the sleeves. Specifically, I shortened them by a couple inches, graded down a size at the wrist, and actually used the cuffs this time. Yay for not having to use a double needle at all! I like the end result better than my previous version, but I might continue to tweak them in the next version. There will definitely be a next version!


Since I thought sewing the Julia Cardigan took too long last time, I experimented with ways to speed up the process (without investing in a serger). I hate slowing down to change feet, so instead of following the instructions step by step, I sewed all the seams that I could with the walking foot one after the other, then switched to the mock overlock foot to finish them, then switched back to the walking foot, etc. This was the first time I had used my walking foot when sewing with knits, and I liked it. I also finished the seams together and pressed to one side, instead of pressing open like the instructions called for. I started cutting out on Sunday and finished on Thursday, so I feel like I improved my time.


The only trouble I had with this cardigan was when I sewed together the doubled over collar. It was twisted and I had to unpick all of it. That’s what I get for sewing late at night! Unpicking knits is incredibly tedious and takes much longer than unpicking quilting cotton. It was worth it though, because I really like this cardigan and will most likely get lots of wear out of it.


Monday, November 24, 2014

Swoon Baby Quilt the First


This is definitely one of my favorite quilts this year. I love that the front is all solids with cozy printed flannel on the back, I love the simple, modern feel of it, I love that it came together in only a couple of weeks, and I love that it was given to a close friend for her upcoming baby.


Let’s start with the pattern. I used the Swoon pattern from Thimble Blossoms and made just one 24” block. I added a 6” border for a 36” square quilt. You can see my inspirations here. It’s a very easy to follow pattern, with color diagrams that I found helpful. Normally, I don’t like to add borders, but I didn’t mind it on this small quilt.


All the fabric is from Pacific Fabrics in Everett. I knew that this quilt needed to feature green, blue and at least one jungle animal. I could not for the life of my find any jungle fabric I liked online, so I hit up Pacific Fabrics in person. There I found this mini elephant flannel from Timeless Treasures. Once I had my backing sorted, I chose four Kona solids from what was in stock in the store: Bleached White, Clover, Royal and Blueberry.


My goodness, I love using flannel as a backing! I polled my Instagram followers for tips on sewing with flannel and prewashed the fabric, according to their advice. It is so cozy and warm that I simply loved working with it. I almost didn’t want to finish hand sewing the binding, it was so comfy!


The quilting I chose is very similar to my Giant Snowburst Quilt: a big ‘x’ in the middle, then echo quilting to the edges. Instead of quilting the lines half an inch apart, this time I quilted them a full inch apart. It was quicker and I thought the less dense quilting would be comfier for a baby quilt. Another twist is that I used both white and green thread to quilt it. The central ‘x’ is green, along with every third line. The rest of the lines are white.


I cannot overstate how much I like this quilt. I might just keep making this one over and over for gifts, it’s so quick and satisfying!


Thursday, October 30, 2014

Pink Greenpoint Cardigan


Oftentimes when my daughter sees me sewing, she asks, “Is that for me?” After a while, I got the hint and made her this little cardigan from Hey June’s Greenpoint Cardigan pattern. Of course, it had to be pink. The fabric I used was Riley Black Designs Solid Knit in Hot Pink, which was easy enough to work with, as far as Jersey knits go.


While I’m happy with the finished garment, I didn’t particularly enjoy sewing this up. The instructions struck me as odd in places, particularly with regards to the cutting layout. It didn’t make any sense to me, so I did it my own way and ended up with tons of yardage left over. The neck lining/button placket was also puzzling, as it had a fold line marked on it. It took me way too long to figure out that I wasn’t supposed to cut it out on the fold, but fold it over once it was cut.


The only modification I made was to draft a new button placement guide and increase the number of buttons to five. It’s not perfect, but it allowed me to use the buttons I had on hand instead of going to the store to buy new ones. The button foot on my machine may look scary, but after lots of practice on scrap fabric, the buttonholes turned out just fine. In the end, the flower buttons are my daughter’s favorite part of the cardigan.


Whether or not I make more of these depends entirely on my daughter. If she asks for another one, I’ll try again, but otherwise I think I’ll move on. So many patterns, so little time!

Tuesday, October 28, 2014

Crazy Cat Lady Sewing Challenge: Catnap Bess Top


For Miss Crayola Creepy’s Crazy Cat Lady Sewing Challenge, I made a Bess Top by Imagine Gnats with two fabrics from Lizzy House’s Catnap line. (Yes, I previously made two garments out of cat themed fabric, but I wanted to make a new one for this challenge. So there.) Initially, I had planned to make a knit garment, but when I couldn’t find a fabric I liked, I pulled the Bess Top from my nascent pattern stash and went from there.


I have admired this pattern for a while, ever since I first saw the cover art. Without disrespecting other pattern garment models, I was impressed that the models used were very different from each other, and different from slimmer models that I don’t relate to. Generally, I do my best to be inclusive of all types of people, but when it comes to garment sewing, I want to see pictures of people that look like me. Knowing my interest in the pattern, my mom gifted me with a paper copy.


The deeper I get into pattern sewing, the more I think I might like PDF patterns better than traditional printed patterns. For this pattern, I had two issues, but both of them may have just been a tracing failure on my part. I trace all my printed patterns, because in my mind cutting them up would be ruining them. PDF patterns I can print again and again.


The first issue I had was with the Y-seam that turns the back piece into sleeves. Once I figured it out, it was a clever bit of sewing, but the first time I attempted it, I could not wrap my head around it at all. After folding and pinning the pleats, I had sewn to the marks as per the instructions, but my version didn’t look like the picture in the pattern at all. It was late, and no matter how long I squinted at the tiny black and white photo, I couldn’t work out where I was supposed to cut to. I left it be and came back to it again after a full night’s rest. The next day, I just marked where the ½” seams should be and found my new marks that way. Well rested, I could follow the instructions easily enough. The rest of the shirt came together quickly.


The only other issue I had was that the high-low hem didn’t line up initially. Again, it could have been a tracing error on my end. I trimmed it up so it matched and continued on my merry way. I didn’t have any light colored knit scraps on hand, so I finished the neckline, armholes and hem with self fabric.


I think one reason this pattern is flattering on a variety of body types is that it had a generous amount of ease. It has so much ease, that next time I make it, I might size down. I would definitely use a fabric with more drape next time. Even though it’s listed as a fabric option on the pattern, with this shirt, the quilting cotton stands out too much from my body for my liking.


The end result is a comfortable and fun shirt that I can wear on the weekend when I’m hanging out with my kid, but probably won’t make it into my workday wardrobe, more’s the pity. At least it coordinates with my Navy Julia Cardigan! Maybe I’ll try again in the spring. The sleeves sure are clever.


Monday, October 27, 2014

Patriotic X and Plus Quilt


Ages ago, the blogosphere exploded with quilts made out of “x and + blocks.” I think there was even a sewalong at one point. The small blocks are ideal for scrap busting. I always liked the pattern, but knew that controlled scrappy was more my style.


The lines of the block reminded me of the stars and stripes of the American flag, so I thought it would make a perfect Fourth of July quilt. It wasn’t until the May/June issue of Quilty that I was inspired to get started on it. Instead of the original 7.5” blocks, the Floral Breeze pattern features 20” blocks. You only need twelve of them for a 60” by 80” quilt!


The original patterns uses the same fabrics for each block, but I wanted my quilt to have more character. I raided my stash, but didn’t come up with very many red and white fabrics, so I stocked up on Hawthorne Threads. I was so enthusiastic about getting started that I neglected to make note of what fabrics I bought. I do know I bought a bunch of fabrics in multiple colors, so there’s lots of Lizzy House Pearl Bracelets, Dear Stella Zig Zags and Confetti Dots, and Riley Blake white on white basics.


In a perfect world, this quilt would be super quick to whip up. I found that I could easily knock out a block or two in an evening. However, I had several sewing distractions, so it took longer than anticipated. I started this quilt in May and finished in October. At least it will be ready for next Fourth of July!


It has been awhile since the timing has been right for me to share a quilt in the Blogger's Quilt Festival, so I’m happy to link up this time.


Friday, October 24, 2014

Navy Julia Cardigan


If someone asked me to sum up my everyday style in five words, those words would be “cardigan sweaters and sensible shoes.” After two years of sewing my own clothes, I have plenty of handmade shirts to go under cardigans, but have never sewn a single thing to go over them. Finally I stumbled across the Julia Cardigan on the Indie Sew site and knew I had to make it. I bought the pattern and the fabric (Robert Kaufman Laguna Cotton Jersey Knit Solid in Navy) and it sat in my “not yet started” pile for a bit. Then my mom pinned the very same pattern on Pinterest, and I convinced her to convert our next sewing day from a quilting day to a garment sewing day.


After our sewing date was set, I realized that I had misread the fabric requirements. Thus, I had purchased two and a quarter yards for the Cardigan Doubled-Over Version, and neglected to buy the additional three-quarters of a yard for the sleeves. However, I played around with the layout of the pattern pieces and managed to cut the whole thing out of the yardage I had. This was the first time sewing with a knit that I didn’t have any usable scraps left after cutting out all the pieces. Next time, I might buy two and a half yards, just to be on the safe side.


All around the blogosphere, this pattern is touted as a quick sew. While I was frustrated that this was not the case for me, I think I know why. It’s because I was using a normal sewing machine and not a serger. The instructions call for pressing the seams open and I chose to finish each of those pressed open seams with a mock overlock stitch. That means that I was sewing every seam thrice. In the same amount of time that it took me to sew this one cardigan on my usual machine, I could have sewn three on a serger. Well, let this be known as the garment that made me want to buy a serger, because I want to make several more, and I want to make them now!


While sewing this cardigan took longer than I liked, I did find this pattern to be easy enough to sew. The only major change I made was that I omitted the cuffs. Truth be told, I lost them somewhere between my mom’s house and my house, since I wasn’t able to finish the cardigan in one sitting. I thought about making replacement cuffs, but then I tried the cardigan on and realized that with my short arms, I didn’t need cuffs at all. I finished the sleeve hems with my trusty twin needle and Wonder Tape. The sleeves were the only things that needed hemmed, thanks to the awesome doubled up collar. Sure, it takes a lot of fabric, but I think it makes the cardigan.


The Belcarra Blouse was my favorite pattern this past spring and summer. The Julia Cardigan may very well be my favorite pattern this fall and winter. I want to make it again in black, like this one from Cut Cut Sew, and also in a patterned knit. In the Laguna Jersey Knit, it is super cozy, so much so that I have to force myself not to wear it every day. (Some people at work have already noticed my multiple Wiksten Tanks and Belcarra Blouses. They’d definitely notice if I wore the same navy cardigan every day.) Guess I’ll just have to make some more soon so that I can be cozy all winter long!

Monday, October 20, 2014

Basic Black Plantain Tee


After the success of my Dotted Boulevard Myrtle Dress, I was excited to sew more with knits. With cooler weather on the horizon, I decided to try my hand at the free Plantain tee pattern from Deer & Doe. After a few small setbacks, I ended up with a basic black shirt that will be worn frequently in the coming colder months.


For the fabric, I chose Robert Kaufman’s Laguna Cotton Jersey Knit Solid in Onyx. Since it’s a solid, the price was under $10/yard, and I thought sewing with a solid knit would be simpler than sewing with a print. I still don’t like how the selvages of knit fabric rolls. How I am supposed to know if I’m cutting exactly on the grain if the edges keep rolling up? Selvage rolling aside, I found this fabric workable and cozy to wear.

This shirt also gave me an opportunity to practice grading between sizes. I wish it came in larger sizes, as I would have graded the hips out more and lengthened it a bit. It’s wearable, but I might fiddle with the pattern pieces next time to make it a bit more flattering.


My machine ate my first neck binding piece, so I had to cut another one, but had plenty of yardage to do so. I really like how the neckline comes together, and finishing it with a twin needle made it look rather professional. After sewing the neckline, though, I had a bit of a downer moment. I was so pleased with my progress, that I tried the shirt on before the front was attached to the back and it looked like it was going to be too small! At that point, I almost gave up. However, I really wanted more practice sewing knits, so I resolved to finish it and give the shirt away if it didn’t fit. Luckily, the knit fabric worked its magic and it ended up fitting after all.

My next obstacle was hemming the shirt. I completely forgot about stabilizing it with Wonder Tape, and so it ended up wavy. Since it is intended as a layering piece, it's not that big of a deal, but I was still disappointed. I referred back to The Colette Guide to Sewing Knits, and remembered the Wonder Tape trick. I used it when I hemmed the sleeves and they came out much better. Of the three sleeve lengths, I chose the longest for maximum warmth.  Come Spring, I look forward to trying out the other sleeve lengths.


After I finished this shirt, my husband commented several times on how much he liked it and that it looked like I had bought it and not made it. That’s compliment enough for me to put the Plantain Tee in the “Make Again” pile. I’m so glad I didn’t give up on it!