When I attended Sewing Summit in 2012, I learned the value
of traveling handmade. I was traveling with my mom, and while we were still in
the airport, we met other Sewing Summit attendees because my mom and several
others were carrying the Weekender bags they had made for the occasion. It was
a really nice moment, and I knew then and there that I wanted to travel
handmade myself at some point.
Fast forward to 2015. I got it in my head that I needed to make a bag
to take to QuiltCon. The Weekender was out of the question, since I’ve only
ever sewn with zippers once before, and I’ve heard that pattern was difficult.
For my first travel bag, I wanted something simple and easy that I could make
with quilted panels instead of interfacing. I stumbled across Noodlehead’s free Cargo Duffle pattern and convinced my mom to sew one with me at one of our
monthly sewing days. Boy, am I glad I had a sewing buddy for this one!
Since I am a travel handmade noob, I simplified the pattern
even more by using quilting cotton for the lining instead of canvas, and by
omitting the pockets. I am happy with both those decisions.
My mom and I started working on our bags separately so that
we could finish them together. I spent time that Friday night choosing my
fabric and texting with my mom. At first, I thought about using some of my
Cotton + Steel stash, but it wasn’t speaking to me for this project. I pulled
out my treasured Lizzy House hoard and chose a print from her Constellations
line, as well as coordinating Butterflies, Jewels and Pearl Bracelets.
On Saturday, my husband took our daughter to the zoo so that
I could work on my bag. That day, I quilted the front and back panels and the
bottom gusset and made the handles. Since my mom was ahead of me, I benefited from her experience and cut my panels 1” bigger to allow for shrinkage, which I
highly recommend. I didn’t interface the handles because I wanted to keep it
simple. I really enjoyed the machine quilting and it was quite satisfying to
use up some of my batting scraps. In addition, I made four strips of WOF
binding. The pattern doesn’t specify exactly how much binding to make, so I
guessed based on the required yardage. That was as far as I could get without
help, since I wanted my mom at my side when I attempted the zipper.
On Sunday, my daughter and I headed to Grammy and Grandpa’s
house for our sewing day. My zipper isn’t 100% perfect because my daughter sat
on my lap and “helped” me sew that part. But with my mom’s guidance, I was able
to do it well enough. When it came time to sew the gussets to the bag front and
back panels, that was when the sewing rage set in.

In retrospect, the problem was that this step essentially forces
a square peg (the panels) into a round hole (the loop of gussets). After sewing
the gusset loop to the top and bottom of the front panel, I couldn’t figure out
how to sew the panel sides to the gusset loop. I stopped to reread the pattern,
read the extra tips blog post, and the sew along. The only help to be found was
the following: “Next, sew each side, just pull and align the raw edge of the
sides.” Just pull? I was so
frustrated I was close to tears. I pulled this way and that and couldn’t get it
to a point where I was comfortable sewing it. In the end, I figured out my own
tip: after you’ve sewn the gusset loop to the top and bottom of a panel, clip
the gusset to the dots on the panel where the sewing stops. Then you can pull the
gusset 90 degrees to meet the side of the panel. After using that trick to
finish connecting the panels to the gussets, I flipped the whole over and sewed
around the corners again, to reinforce them.
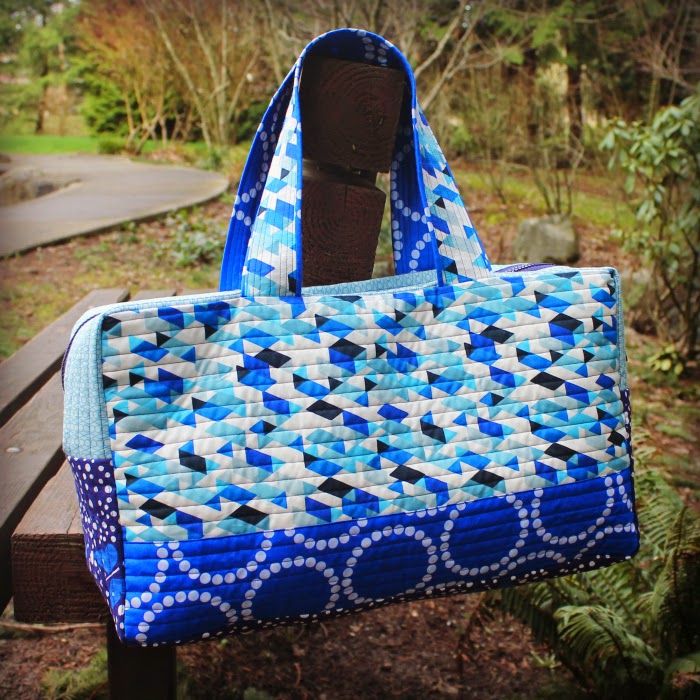
At that point, I was still mad, but it was easy enough to
finish the inside seams with the binding I had made the day before. In roughly
36 hours, I had sewn my first usable travel bag. I didn’t enjoy the process,
but I love the finished bag. It’s a nice size for a carry-on, and the
handles are that in-between length that works equally well for carrying by hand
or slinging over your shoulder. This bag is floppy and soft and I’m okay with
that.
Will I make this pattern again? Perhaps. If I do, I would
add some interfacing to make it more durable, include the pockets, and perhaps
line the bag instead of finishing it with binding. I would also do the zipper
differently, since I’m not happy with the way the ends of the zipper have gaps
between them and the bag. Part of me would like to give this pattern another
chance, because I’ve always been a fan of Noodlehead. This pattern is certainly
doable, but I think it assumes a higher skill level or more experience with bag
making than I have. If you’d like to read about another Cargo Duffle, check out
my mom’s bag here. Thank goodness for sewing buddies!


This turned out beautifully!
ReplyDeletecongrats on another bag finish! I generally avoid sewing three-dimensional items. They scare me but I do love the idea of "traveling handmade". Perhaps that will be enough to push me to do it??
ReplyDeleteWell it certainly looks fantastic, sorry it was so frustrating, but I know that feeling!
ReplyDeleteYour choice of fabrics is so you, and I love that you made it your own - so much better than not making it at all! Yay for struggling through, finding your own helpful tip, and creating a beautiful bag you will enjoy using next week! And of course, yay for sewing buddies!!
ReplyDeleteLove your choice of fabrics for your bag - you will be travelling in style!
ReplyDeleteYour bag is lovely and I hope to get a look at it next week. Making luggage is always going to be a challenge as to give it the heft to be luggage, and a nice look too, it often requires some challenging 3D moves. Next time, if you decided to do a next time, you will find it a lot easier.
ReplyDelete