Saturday, February 28, 2015

Cotton + Steel Sparkle Canvas Bag

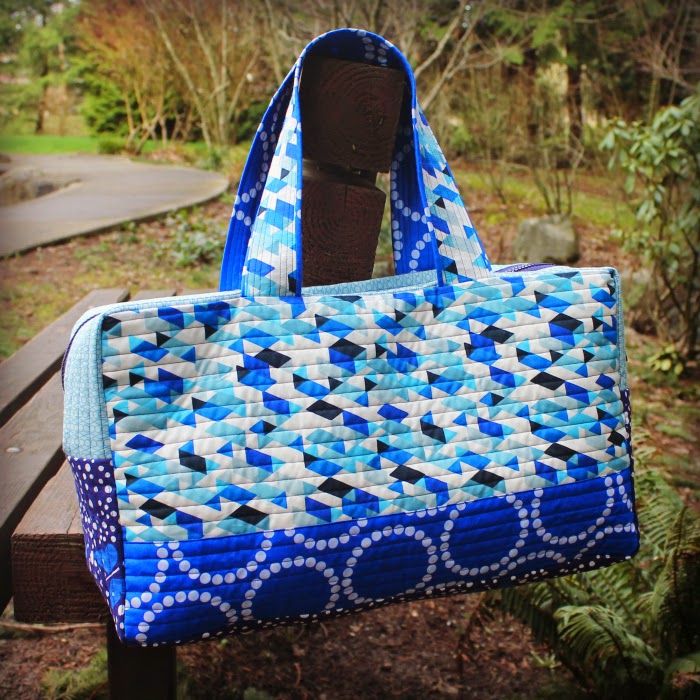
Recently I bought some Cotton + Steel Sparkle Canvas, and it was just begging to be turned into a bag. I loosely followed the instructions for the Button-Down Shirt Bag out of Ruby Star Wrapping by Melody Miller and Allison Tannery. Instead of using a button-down shirt for the exterior, I whipped up a couple of simple patchwork panels out of a few Cotton + Steel fat quarters from my stash. The Sparkle Canvas was used as the lining and handles. I was really pleased with it. It was easy to sew with, and gave the bag some heft without having to fiddle with interfacing. While I used this as a gift bag, the recipient could easily use it as a tote bag. Needless to say, I would definitely make a bag like this again.
Photo by Debbie Jeske

Friday, February 20, 2015

Little Fancy Purses in Cotton + Steel


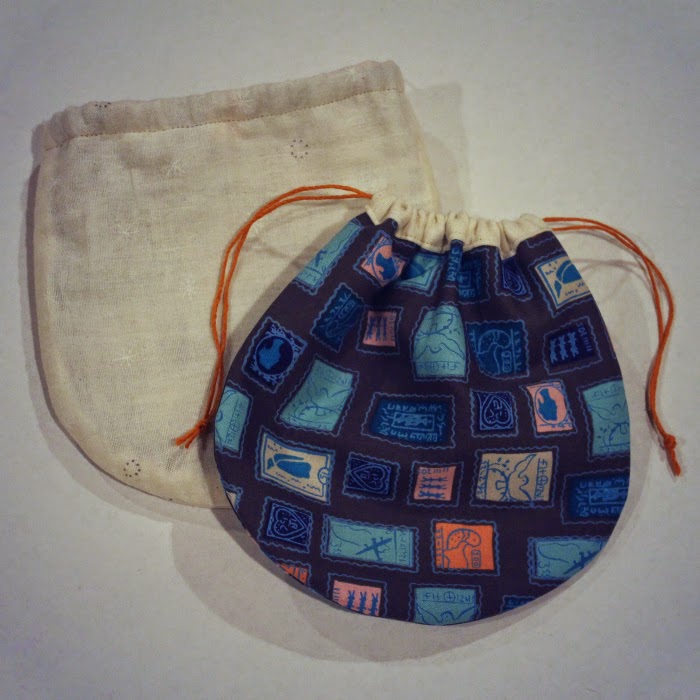
As previously mentioned, the other day I whipped up a couple of Little Fancy Purses from the book Handmade Bags In Natural Fabrics by Emiko Takahashi. Even though the patterns in this book are meant to be hand sewn, I found it easy enough to machine sew these little bags instead. I used a Cotton + Steel fat quarter for the exterior, and scraps from my Spark Double Gauze Belcarra Blouse for the interior. In retrospect, the double gauze wasn’t the best choice for the lining.


The lining piece is longer than the interior, and is cleverly folded and sewn to make the drawstring casing. I had a bit of a hard time making the casings, because I cut out the pattern pieces without reading the directions closely. The templates in this book do not include seam allowances! I was supposed to add 3/8” inch seam allowances to the templates, but didn’t realize it until after the pieces were cut. I wasn’t about to waste precious double gauze scraps, so I forged ahead. When it came time to fold and sew the casing, the double gauze did not want to cooperate. Luckily, I was able to use Wonder Tape to get it to behave. I think they turned out rather well, all things considered. They are super cute, but in the future, I’ll make my own bigger version. Incidentally, while scrolling through my Bags Pinterest board the other day, I realized that the technique this book uses is very similar to the Pretty Drawstring Pouch from A Spoonful of Sugar that I pinned last year. Small world. I’m looking forward to making more bags from this book, especially the Eco Bag.


Speaking of books, be sure to check out this month's Sew the Library link-up at Weekend Doings.

Monday, February 16, 2015

Spark Double Gauze Belcarra Blouse


Big surprise, I made another Belcarra Blouse. It’s my sixth, for those of you counting at home. Since you already know how much I love this pattern, let’s talk about the fabric. I am a big Cotton + Steel fangirl, and wanted to try some of their double gauze as soon as I heard about it. I picked the Spark Double Gauze in Neutral, because it looked kind of gray online. It’s not at all. It’s definitely cream, and almost the exact shade of cream that graces the interior walls of our home. Not my favorite color by a long shot, but the texture of this fabric won me over so much that the color doesn’t really matter. Double gauze is so soft and comfy! It is a little shifty to sew with, but since I used a pattern I was familiar with, I could take my time to focus on marking, cutting and sewing the fabric with care. I really do love the Spark fabric and am contemplating making something out of the navy colorway. In cream, the pattern is so subtle you can hardly see it.


Of all my Belcarra Blouses so far, this is the best constructed. As usual, I used French seams throughout. Since the double gauze tended to fray pretty quickly, the French seams were perfect for keeping the inside clean and orderly. I can pop this in the wash and not worry about it falling apart, and have done so several times already. On the sleeves, I omitted the cuffs and just used 1” bias strips to finish them. Next time, I would use larger strips, since the 1” ones were a little bit fiddly in double gauze. I also successfully incorporated bra strap carriers, which turned out to be a really good idea.


The only thing I don’t like about this shirt is that it isn’t 100% opaque. You would think that since double gauze is essentially two pieces of fabric woven together that it would be opaque, but the cream colorway is slightly transparent, to the point where this shirt has to be worn with a camisole underneath. Thanks to the aforementioned bra strap carriers, all straps are neatly kept out of view. I’m looking forward to wearing this shirt on its own during the warmer months, but for now am enjoying it layered under cardigans. If you haven’t tried sewing with double gauze yet, you really should consider it.


Saturday, February 14, 2015

Valentine's Day Gift Bags


Well, I think I have found a new favorite gift bag pattern! Recently, I sewed up a couple bags from the Little Fancy Purse pattern out of the book Handmade Bags In Natural Fabrics by Emiko Takahashi. The bags were cute enough, but I didn’t really care for the construction method, and they were too small for most gift giving. (Watch for more on those bags in a separate post.) However, since the shape was super cute, I decided to make them bigger and better. It was easy enough to draw larger templates from scratch and to construct these bags with a method I like better, similar to the Reversible Drawstring Bag tutorial by Pink Penguin.


The smaller bag is roughly 9.5” by 9.5” and made from a few different Cotton + Steel fat quarters. The larger bag is approximately 14.5” by 14.5”. The main fabric is “little bit’o love” by Alexander Henry. My daughter picked out the other day at Island Quilter and it made me happy to sew something for her with it so soon after she had chosen it.


These gift bags turned out to be the perfect size for my Valentine’s day gifts for my husband and daughter. I’m so pleased with them that I anticipate making many, many more, especially for Christmas.


Happy Valentine’s Day!

Wednesday, February 11, 2015

Constellations Cargo Duffle

When I attended Sewing Summit in 2012, I learned the value of traveling handmade. I was traveling with my mom, and while we were still in the airport, we met other Sewing Summit attendees because my mom and several others were carrying the Weekender bags they had made for the occasion. It was a really nice moment, and I knew then and there that I wanted to travel handmade myself at some point.

Fast forward to 2015. I got it in my head that I needed to make a bag to take to QuiltCon. The Weekender was out of the question, since I’ve only ever sewn with zippers once before, and I’ve heard that pattern was difficult. For my first travel bag, I wanted something simple and easy that I could make with quilted panels instead of interfacing. I stumbled across Noodlehead’s free Cargo Duffle pattern and convinced my mom to sew one with me at one of our monthly sewing days. Boy, am I glad I had a sewing buddy for this one!
Since I am a travel handmade noob, I simplified the pattern even more by using quilting cotton for the lining instead of canvas, and by omitting the pockets. I am happy with both those decisions.

My mom and I started working on our bags separately so that we could finish them together. I spent time that Friday night choosing my fabric and texting with my mom. At first, I thought about using some of my Cotton + Steel stash, but it wasn’t speaking to me for this project. I pulled out my treasured Lizzy House hoard and chose a print from her Constellations line, as well as coordinating Butterflies, Jewels and Pearl Bracelets.
On Saturday, my husband took our daughter to the zoo so that I could work on my bag. That day, I quilted the front and back panels and the bottom gusset and made the handles. Since my mom was ahead of me, I benefited from her experience and cut my panels 1” bigger to allow for shrinkage, which I highly recommend. I didn’t interface the handles because I wanted to keep it simple. I really enjoyed the machine quilting and it was quite satisfying to use up some of my batting scraps. In addition, I made four strips of WOF binding. The pattern doesn’t specify exactly how much binding to make, so I guessed based on the required yardage. That was as far as I could get without help, since I wanted my mom at my side when I attempted the zipper.

On Sunday, my daughter and I headed to Grammy and Grandpa’s house for our sewing day. My zipper isn’t 100% perfect because my daughter sat on my lap and “helped” me sew that part. But with my mom’s guidance, I was able to do it well enough. When it came time to sew the gussets to the bag front and back panels, that was when the sewing rage set in.
In retrospect, the problem was that this step essentially forces a square peg (the panels) into a round hole (the loop of gussets). After sewing the gusset loop to the top and bottom of the front panel, I couldn’t figure out how to sew the panel sides to the gusset loop. I stopped to reread the pattern, read the extra tips blog post, and the sew along. The only help to be found was the following: “Next, sew each side, just pull and align the raw edge of the sides.” Just pull? I was so frustrated I was close to tears. I pulled this way and that and couldn’t get it to a point where I was comfortable sewing it. In the end, I figured out my own tip: after you’ve sewn the gusset loop to the top and bottom of a panel, clip the gusset to the dots on the panel where the sewing stops. Then you can pull the gusset 90 degrees to meet the side of the panel. After using that trick to finish connecting the panels to the gussets, I flipped the whole over and sewed around the corners again, to reinforce them.

At that point, I was still mad, but it was easy enough to finish the inside seams with the binding I had made the day before. In roughly 36 hours, I had sewn my first usable travel bag. I didn’t enjoy the process, but I love the finished bag. It’s a nice size for a carry-on, and the handles are that in-between length that works equally well for carrying by hand or slinging over your shoulder. This bag is floppy and soft and I’m okay with that.
Will I make this pattern again? Perhaps. If I do, I would add some interfacing to make it more durable, include the pockets, and perhaps line the bag instead of finishing it with binding. I would also do the zipper differently, since I’m not happy with the way the ends of the zipper have gaps between them and the bag. Part of me would like to give this pattern another chance, because I’ve always been a fan of Noodlehead. This pattern is certainly doable, but I think it assumes a higher skill level or more experience with bag making than I have. If you’d like to read about another Cargo Duffle, check out my mom’s bag here. Thank goodness for sewing buddies!

Monday, February 9, 2015

Blue Plaid Staple Dress


This dress was a happy accident. Shortly before Christmas, Drygoods Design had a sale and I purchased three yards of Moda’s Wee Bright Plaid Blue Brushed Cotton. I was looking for flannel and it was in the “Flannel/Brushed Cotton” section on their website. I’m still not exactly sure what the difference is between flannel and brushed cotton. Based on this one sample, it seems that brushed cotton is softer and warmer than quilting cotton, but not as soft and warm as flannel.


The fabric sat around in my stash until I made the Royal Oslo Cardigan and realized that it coordinated. I wanted something quick and easy, so I reached for my copy of April Rhodes’ Staple Dress. The first Staple Dress I made was in October 2013, so it was definitely time for another one. Even though the pattern wasn’t difficult the first time around, I was pleasantly surprised by how easy it was this time. Sometimes I’m frustrated with my amateur seamstress skills, but this was one instance where I could feel how much my skills have improved over time. As a result, sewing this dress made me very, very happy.


Initially, I thought I would try my hand at matching plaid for this dress, but it didn’t work out. After washing and pressing, the plaid pattern of the fabric wasn’t quite aligned. If I lined up the horizontal lines to make the pattern match at the side seams, then the vertical lines skewed to one side. I chose to optimize for keeping the vertical lines straight and decided that I was okay with not matching the plaid this time. I know matching plaids is supposed to be a mark of quality, but I like this dress well enough without it. I’ll try again another time.


What can I say about the Staple Dress that hasn’t already been said before? I sewed the same size as last time, but retraced the pattern so that I could use the straight hem instead of the high-low hem. I do love a good high-low hem, but thought that this fabric lent itself more to the straight hem. For this version, I omitted the elastic shirring at the waist. I always wear my first Staple Dress with a belt, so the shirring is rather redundant for me. Adding the pockets was a no-brainer, because I’ve learned that if a dress doesn’t have pockets, I won’t wear it.


All in all, I’m quite pleased with this dress. It coordinates with both my Royal Oslo Cardigan and my Navy Julia Cardigan, and is a pattern that I know I will wear, so I feel it aligns nicely with my Wardrobe Architect efforts. Also, it’s nice to have a more wintery Staple Dress in my closet, because Spring can’t get here early enough.

Sunday, February 1, 2015

Fresh Sewing Day: January 2015

Well, 2015 is a great year so far! Last month, I finished one table runner, three garments and a cowl. (I haven’t been able to take decent photographs of my Blue Plaid Staple Dress yet, so watch for that blog post later this month.) Best of all, inspiration abounds, and I’m super excited about the items in my sewing queue and about going to QuiltCon in a few weeks. 2015 looks like it’s going to be one heck of a year for sewing!
Linking up with Fresh Sewing Day at Lily’s Quilts.